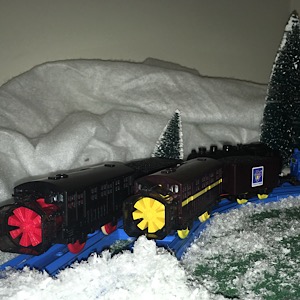
Custom snow plow part/Christmas layout.

29 Replies, 41956 Views

(01-04-2016, 03:03 AM)Super Wrote: Fantastic work, and like Tramp says, terrific job on the paint. I too would like to see the insides and a closer look at the windows. Do you use the matte tape just to give the glass a milk like finish so it they can be seen? You mention you used 2x 1.5volt LED's but you used a 2x AAA Battery pack. I have not seen 1.5volt LED's and wouldn't the 2x AAA's put out 3volt? Very nicely done. Is the paint air brushed or spray can and did you have to paint the inside so the lights did not emit through the plastic or did the outside paint block it?

Thanks Super. I will try and get a few interior pics as well. I must admit the led's I used were not my favorite. In fact I would probably not buy them again. They seem very cheap, well they were, but still out of a 10 pack I had issues with probably 3-5 in each of the colors I purchased.

Maybe the were 3v now that I think about it. Which is the reason for the two AAA cells. I remember trying 1 AAA and it would not power 1 Led but two powered two Led's.

The paint was actaully trial and error. I started with a matte finish spray paint. I found that I had various issues with that, like the paint bubbling, not drying even, etc. so after tha base coat of the blue, I wet sanded with 1000 grit and then did one more coat of the blue. The tops were metallic acrylic paint found in the craft section at Walmart. These worked quite well. Next time I will try in the air Brush unit though to avoide brush strokes. So that said the interior was painted the blue.

For the tape, that is exactly the reason. I even put a little black mark on them to try and simulate a sillotte of a person. Big Grin. This seemed to work well with that tape. I basically cut a clear piece of plastic to fit and then out the tape over. It had a bit excessive so it stuck to the interior on its own, no need for extra adhesive.

I will try and get some more pics. Thanks for the likes on these. This was my first go, so hopefully some more in the future.
[-] The following 1 user Likes ripley802's post:
  • Super
(01-04-2016, 01:43 AM)ripley802 Wrote: Excellent. Thanks Tramp. Yeah I was struggling to find the right fit. I ordered a bunch of dual AA battery packs/housings, only to find they were a hair two big. So I instead fitted two AAA packs/housings. I will have to look into the button cell batteries. Do you find they stay useful for awhile? I mean do the batteries die very often?

I am toying with the idea of stringing all of the coaches together and using a set of 10 LED's that run on two AA and fitting a rear caboose or flatbed with a tarp like housing to cover. Not sure how that may work though. I like the one super did with the red coaches.

Awesome videos BTW. Very Nice work...

Thank you, yeah, the cr2032 is perfect for things like this,

[Image: 26973609-418F-479B-B094-3A7B66392D7C_zpsrqgwxjv1.jpg]

As you can see it's so much smaller, yes your right with them being smaller they don't last as long as AA's but to be honest they do have a good life span, when I bought them I bought a big cheap pack (from China) and they aren't expensive in comparison to AA batteries.

Your right stringing several carriages together would work fine, personally I don't like running wires between carriages, my son isn't very careful when separating rolling stock and I haven't found any plugs/sockets suitable for attaching/detaching between carriages. But in reality you could power your whole train from x2 AAA batteries if you wanted too,

Great idea with the silhouette's in the Windows, a good step towards realism I bet it was a fiddly job. As super says, painting the inside of your carriage in say black prevents light leaking through the carriage walls, I never got around to painting mine, although, yours don't look to leak any light. I suppose your external paint will do the same job as painting the inside!

Keep up the good work,

-p.s. I just read over my post, I said I had used cr3032 button cell batteries, but I was wrong, it was cr2032 batteries, I've changed my post accordingly! I don't actually know what the difference between the batteries are, but cr2032 are considerably cheaper!
(This post was last modified: 01-04-2016, 09:12 AM by Tramp.)
[-] The following 1 user Likes Tramp's post:
  • Super
(01-04-2016, 01:43 AM)ripley802 Wrote: I am toying with the idea of stringing all of the coaches together and using a set of 10 LED's that run on two AA and fitting a rear caboose or flatbed with a tarp like housing to cover. Not sure how that may work though. I like the one super did with the red coaches.
The second to last car on the Flying Kipper is carrying a item covered in a tarp. I would take advantage of an area like that to hide a battery. For a passenger train, take a van, for example this blue mail car. Scroll down to the products.
http://thomastrackmaster.wikia.com/wiki/Dodge
I AM NOT DEAD. Just inactive. 
Here are a couple interior shots:

[Image: 9232EA53-B4AF-49BA-BCAD-1E828034FF93_zpsuibq0dzz.jpg]
[Image: 4AA8C7C1-92E1-46D4-931E-1FA4700853BB_zpsodnrhbsl.jpg]

And one of the outside close up. The thin silver line is a silver sharpie:
[Image: 10EB364C-090B-46A7-A886-1DF75190395E_zps4raram82.jpg]
[-] The following 1 user Likes ripley802's post:
  • Super
Very nice. I really like those windows with the matte finish as it will smooth out the interior lighting so its not so harsh and it diffuses seeing inside when daytime running. Where did you get the clear plastic from and did you apply the tape on the inside or facing to the outside of the clear plastic? It looks to be 3volts as it looks like you wired the 2 battery packs in Series. Is there an on/off switch wired in and do you have problems with the bare wire shorting out with themselves or touching the metal axle? Sorry for so many questions Undecided
[Image: super-smiley-emoticon.gif]
[-] The following 1 user Likes Super's post:
  • ripley802
(01-05-2016, 02:56 AM)Super Wrote: Very nice. I really like those windows with the matte finish as it will smooth out the interior lighting so its not so harsh and it diffuses seeing inside when daytime running. Where did you get the clear plastic from and did you apply the tape on the inside or facing to the outside of the clear plastic? It looks to be 3volts as it looks like you wired the 2 battery packs in Series. Is there an on/off switch wired in and do you have problems with the bare wire shorting out with themselves or touching the metal axle? Sorry for so many questions Undecided

Thanks Super. No problem. So basically I took just some clear plastic, actually from a package that something came in. I suppose you could buy a sheet but I was scrounging. I cut it into about 3/4" strip and the applied a long piece of the tape. It covered the plastic and then hung off on all sides. This allowed me to stick it firmly to the inside of the coach. This worked out very well.

Yes the Led's are in series and are 3v total. This goes to a switch mounted on the bottom of the coach. The led's as o mentioned are a bit strange and finicky. The bare wire actaully has a coating on it. To get them to work I had to scrape a bit off then soldier them. So far once I got them working no issues so far.
Thanks. So I take it that you located the switch in that little rectangular spot in the chassis as pictured. What type switch did you use?


Attached Files Thumbnail(s)
   
[Image: super-smiley-emoticon.gif]
(01-05-2016, 04:10 AM)Super Wrote: Thanks. So I take it that you located the switch in that little rectangular spot in the chassis as pictured. What type switch did you use?

That's correc and secured by hot glue. Here is what th look like:

http://www.ebay.com/itm/20pcs-Micro-SPDT...Sw5IJWd~S3
Many thanks Ripley, those are perfect type switches. I had been looking for micro button switches before. Ones where when lightly pushed turned on and pushed for off but the only ones I could find were ones that turned on when you pushed but once released turned off. I thought these button type switches would be better for two reasons, one you only need to drill the proper sized hole for installation as the buttons are normally round or square and two, easier to turn the coaches on and off without having to slide a switch. I use the ones like in your link too but I am always open to new and easier ideas.
[Image: super-smiley-emoticon.gif]
[-] The following 1 user Likes Super's post:
  • ripley802
(01-05-2016, 09:58 AM)Super Wrote: Many thanks Ripley, those are perfect type switches. I had been looking for micro button switches before. Ones where when lightly pushed turned on and pushed for off but the only ones I could find were ones that turned on when you pushed but once released turned off. I thought these button type switches would be better for two reasons, one you only need to drill the proper sized hole for installation as the buttons are normally round or square and two, easier to turn the coaches on and off without having to slide a switch. I use the ones like in your link too but I am always open to new and easier ideas.

I agree. These are the shorter version. I ordered some taller ones too but they still are not the right height for the TnA switches. Luckily I have a few spares for those. I could probably track down the right size, just haven't had to yet. Although give my issues sourcing the battery terminals and the 4mm drive gears who knows. Seems like Tomy/Plarail made custom parts that are not remade/sold unless through a custom means.
[-] The following 1 user Likes ripley802's post:
  • Super


Users browsing this thread: 1 Guest(s)